PhotoStructure for Node
These are instructions for advanced users who want to run PhotoStructure on a server without Docker.
If you have questions or get stuck, hop into the forum or discord. We’ll help get you set up!
Prerequisites
PhotoStructure for Node requires:
agreement to all terms in the end-user license
a 64-bit Intel or AMD CPU. Note that Apple Silicon and Linux ARM support is experimental.
one of:
- Ubuntu LTS 22.04, 24.04, or 26.04
- Debian 12 (Bookworm) or 13 (Trixie)
- Linux Mint 22.x
- Fedora 40 or later
- Windows 10 or 11
- macOS 12 (Monterey) or later
Node.JS (version 22.3 or later, version 24 recommended).
Contents
We’ve got instructions for the following operating systems:
 Ubuntu, Debian, Mint, LMDE
 Fedora
 macOS
macOS Windows 10 / Windows 11
 Raspberry Pi
🐧 Installation for Ubuntu, Debian, Mint, and LMDE
These instructions cover any recent apt-based Linux distribution: Ubuntu LTS 22.04, 24.04, or 26.04; Debian 12 (Bookworm) or 13 (Trixie); Linux Mint 22.x; and LMDE 6.
Step 1: Consider hardening your server
Instructions for “server hardening” are on the forum.
Step 2: Install prerequisite packages
Open a terminal and run:
sudo apt install build-essential python3-dev \
  git perl libjpeg-turbo-progs
What each does:
build-essentialandpython3-devcompile several native libraries that accelerate image and database operations.gitfetches and updates the PhotoStructure source code.perlruns ExifTool for reading and writing metadata in images, videos, and sidecars.libjpeg-turbo-progsvalidates and manipulates JPEG images.
Step 3: Install media codecs
Follow the media codec support page for your distribution’s install command.
Step 4: Create a role user to run PhotoStructure
Create a dedicated role user to run PhotoStructure, as you would for any service.
sudo adduser --disabled-password photostructure
This role user needs read access to your photos and videos, and write access to
- the directory that holds your PhotoStructure library
~photostructure/.config/PhotoStructure(the system settings directory)~photostructure/.cache/PhotoStructure(the scratch directory)
Note:
- The system settings directory default can be changed by setting the
PS_CONFIG_DIRenvironment variable. - The scratch directory can be changed by setting the
PS_CACHE_DIRenvironment variable. - Read more about advanced settings.
Step 5: Install Node.js
Two options for installing Node.js:
Option 1, via your package manager
This installs Node.js via NodeSource packages.
Node.js gets security updates automatically whenever you run apt update && apt upgrade. The tradeoff: initial setup is a bit more involved than fnm, and you can only have one version of Node.js installed at a time.
- Download and import the Nodesource GPG key
sudo apt-get update
sudo apt-get install -y ca-certificates curl gnupg
sudo mkdir -p /etc/apt/keyrings
curl -fsSL https://deb.nodesource.com/gpgkey/nodesource-repo.gpg.key \
  | sudo gpg --dearmor -o /etc/apt/keyrings/nodesource.gpg
- Set up the deb repository:
NODE_MAJOR=24
echo "deb [signed-by=/etc/apt/keyrings/nodesource.gpg] https://deb.nodesource.com/node_$NODE_MAJOR.x nodistro main" \
  | sudo tee /etc/apt/sources.list.d/nodesource.list
- Run update and install:
sudo apt-get update
sudo apt-get install nodejs -y
- Then configure
npm:
export NPM_PREFIX=~/.npm
mkdir -p "$NPM_PREFIX"

npm config set prefix "$NPM_PREFIX"

if [ -r ~/.bashrc ]; then
  echo "export PATH=\"\$PATH:$NPM_PREFIX/bin\"" >> ~/.bashrc
else
  echo "Please add $NPM_PREFIX/bin to your shell login script"
fi
This last step configures npm to write globally-installed packages into
~/.npm, instead of the default, which is to write to
/usr/lib/node_modules, which is a system directory that no user should have
write-access to.
More information about the prefix setting is on the npmjs.com website.
Option 2, via fnm:
If you have any other software on your server that needs a different version of Node.js you may want to use fnm instead.
Fast Node Manager, or fnm, manages one or more versions of Node.js per user. It’s a Rust-based alternative to nvm that has several advantages:
- Faster shell startup.
fnmis a single binary;nvmis a multi-thousand-line shell function sourced into every new terminal. - Simpler systemd integration. Point your unit at the Node binary
fnmmanages directly — no need to source a shell function inside abash -lcwrapper. - Reads
.nvmrc. Existing per-project Node pins keep working without conversion.
Already using nvm? It still works — feel free to keep it. The instructions below cover fnm for fresh installs.
curl -fsSL https://fnm.vercel.app/install | bash
The installer adds shell integration to ~/.bashrc (or ~/.zshrc). Restart your shell, then run
fnm install 24
fnm default 24
Security updates to Node.js will not be applied automatically. When a new patch is released, run
fnm install 24 && fnm default 24
to update the default alias to the newer version.
Notes
- Consider curling (any!) setup script to a file and reviewing the file before executing as root.
- You will have performance problems if you use the snap version of Node.js.
Step 6: Download and start PhotoStructure
This assumes you’re going to install PhotoStructure into your new role user’s
home directory, ~photostructure.
sudo --login --user photostructure bash

cd ~photostructure

git clone https://github.com/photostructure/photostructure-for-servers.git

cd photostructure-for-servers

./start.sh
Jump to the Start PhotoStructure section for more information.
Step 7: Set up a systemd service (optional)
Use the systemd wizard to generate a unit file tailored to your setup. The wizard covers Node.js version managers, library directory, security hardening, watchdog monitoring, and troubleshooting.
🐧 Installation for Fedora
Step 1: Consider hardening your server
Instructions for “server hardening” are on the forum.
Step 2: Install prerequisite packages
Open a terminal and run:
sudo dnf install @development-tools \
  git perl libjpeg-turbo-utils libheif-tools ffmpeg
Notes:
@development-toolscompiles several native libraries needed by PhotoStructure.gitfetches and updates the PhotoStructure source code.perlruns ExifTool for reading and writing metadata in images, videos, and sidecars.libjpeg-turbo-utilsvalidates and manipulates JPEG images.libheif-toolsadds HEIF image support.ffmpegadds video support.
Step 3: Install Node.js
You can either install with NodeSource or with fnm.
Pick NodeSource if you want Node.js to get updated automatically by yum/dnf. If you need to run multiple versions of Node.js concurrently, fnm is a
better route, but note that upgrades, even for security issues, are manual.
NodeSource
sudo yum install https://rpm.nodesource.com/pub_24.x/nodistro/repo/nodesource-release-nodistro-1.noarch.rpm -y
sudo yum install nodejs -y --setopt=nodesource-nodejs.module_hotfixes=1
And then set up npm prefix with these steps.
fnm
Step 4: Finish
The remaining installation steps are the same as on Ubuntu. Follow along here.
🍎 Installation for macOS
PhotoStructure needs the following:
- Xcode’s command line tools,
- Node.js v24,
- ffmpeg,
- jpeg-turbo, and
- Python
You’re free to install these by yourself, but homebrew makes this much easier.
Step 1: Install Xcode command line tools
Open Terminal.app and run this:
xcode-select --install
sudo xcode-select --reset
Note that xcode-select will take several minutes to install.
Step 2: Install homebrew
Open a terminal and run:
/bin/bash -c "$(curl -fsSL https://raw.githubusercontent.com/Homebrew/install/HEAD/install.sh)"
At the end of this command, there are instructions to add homebrew to your PATH. Make sure you do that! It’ll look something like this:
(echo; echo 'eval "$(/opt/homebrew/bin/brew shellenv)"') >> ~/.zprofile

eval "$(/opt/homebrew/bin/brew shellenv)"
Step 3: Install PhotoStructure’s dependencies
In a terminal, run the following:
brew doctor && brew upgrade && brew install -q ffmpeg jpeg-turbo python python-setuptools node@24
Note that the list of homebrew packages changes regularly with new versions of PhotoStructure.
If you’re upgrading, start.sh will run this command for you automatically when it detects macOS and homebrew, unless you set NOBREW=1.
What’s all this?
brew doctorverifies your system setup looks OK.brew upgradeensures we’re getting the latest version of everything.brew install ffmpeginstalls FFmpeg, used for video encoding.brew install jpeg-turboinstalls JPEG tooling used by PhotoStructure to validate images.brew install python python-setuptoolsinstalls both Python 3 and distutils, required to compile PhotoStructure’s native libraries.brew install node@24installs Node.js. PhotoStructure is a Node.js application.
Note that installing Node.js will emit some instructions that you must follow. They’ll look something like this:
echo 'export PATH="/opt/homebrew/opt/node@24/bin:$PATH"' >> ~/.zshrc
echo 'export LDFLAGS="-L/opt/homebrew/opt/node@24/lib"' >> ~/.zshrc
echo 'export CPPFLAGS="-I/opt/homebrew/opt/node@24/include"' >> ~/.zshrc
source ~/.zshrc
Step 4: Download PhotoStructure
In a terminal, run
cd ~ # or wherever you want to put the code that runs PhotoStructure (it's less than a GB)

git clone https://github.com/photostructure/photostructure-for-servers.git

cd photostructure-for-servers

./start.sh
Jump to the Start PhotoStructure section for more information.
🪟 Installation for Windows 10/11
Step 1: Install Git
Install Git for Windows.
You want the “64-bit Git for Windows” installer option.
The git installer asks a lot of questions: PhotoStructure will work fine if you accept all the defaults. Hop into Discord if you have questions, though!
Step 2: Install Node.js
Install Node.js version 22 or later (version 24 recommended).
Keep “Add to PATH” selected.
On the last screen, select “Automatically install the necessary tools.”:
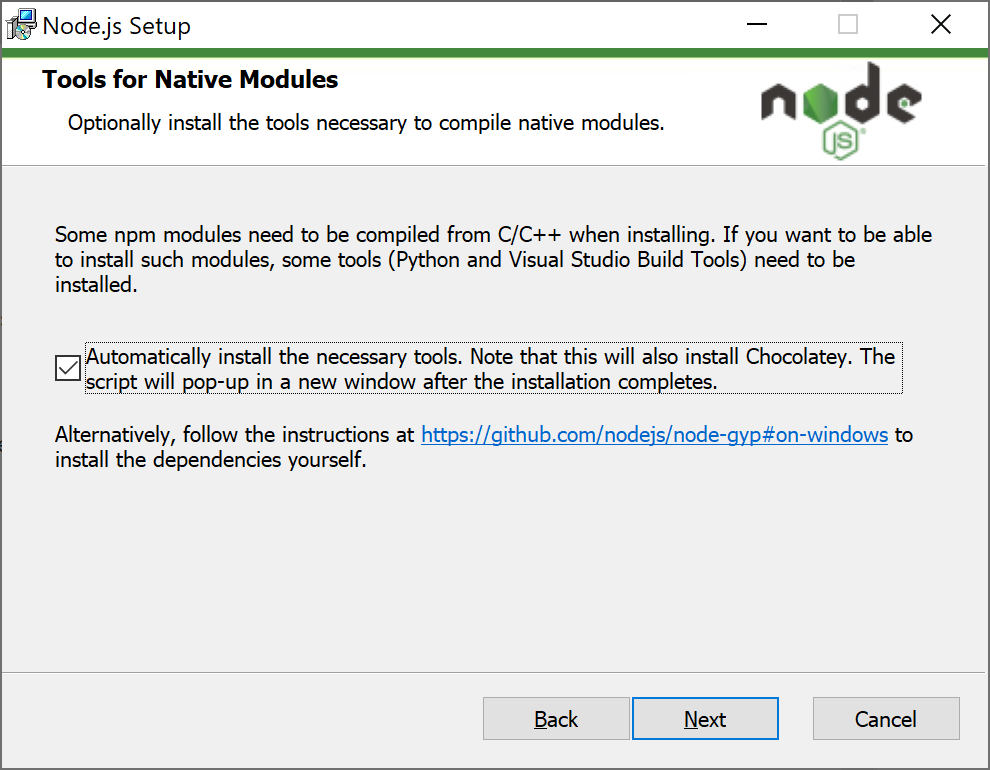
The installation will take a while, as the Node.js installer will install
Chocolatey, and then ask choco to install the tools
necessary to build native modules. PhotoStructure uses several of these modules,
so this step cannot be skipped.
Step 3: Install JPEG and video support
If you want to install video support, after installing node and the build
tools finish installing, open a new Administrator PowerShell, and run:
choco install ffmpeg jpegtran
Wait for the installations to finish, and then close the PowerShell window
by typing exit and hitting return.
Step 4: Install HEIF support
If you have a recent iPhone or Samsung smartphone, you probably have HEIF-encoded photos. Follow these HEIF installation instructions. Note that this is optional.
Step 5: Download PhotoStructure
In a new Git Bash terminal (don’t use cmd or PowerShell!), run these
commands:
npm install --global yarn npm

cd ~ # (or whatever directory you want to install PhotoStructure into)

git clone https://github.com/photostructure/photostructure-for-servers.git

cd photostructure-for-servers

./start.sh
Note:
npm install --global yarn npminstalls yarn and makes sure npm is the latest available version.start.shdownloads and installs some additional software (like exiftool-vendored).This can take a while, but it only happens after PhotoStructure or Node.js is upgraded. Subsequent restarts should be quick.
Step 6: Automatic launch at startup
If you want PhotoStructure to run at startup, follow these instructions.
🚀 Starting PhotoStructure
cd ~photostructure/photostructure-for-servers # or wherever you cloned the repo
./start.sh
It prints a localhost URL to open in a browser. Chrome, Firefox, and Safari are supported on desktop and mobile.
Notes
The
./start.shscript is short and only runs “bootstrap.js” and then “photostructure.js”.In prior versions of PhotoStructure for Node, whenever there were updates to
start.sh, bash would lose track of where it was after the upgrade, which could cause confusing and non-reproducible errors. In v2024.5 we moved as much as possible intobootstrap.js. This should be transparent to you.The startup process verifies that
node,git,python, and other required tools are installed. It then runsgit pull, installs dependencies withyarn, and launches PhotoStructure.You can use
./start.sh --helpto see more detailed usage information.The first time you run
start.sh, it will download and compile dependencies, which will take a moment, and then launch PhotoStructure. Subsequent starts will be much faster, unless there is a new release or your version of node is upgraded. Recompilation happens automatically.PhotoStructure currently binds to localhost only by default, so if you want to access it elsewhere, you need to either set the
exposeNetworkWithoutAuthlibrary setting to true, or set the environment variablePS_EXPOSE_NETWORK_WITHOUT_AUTHto 1. PhotoStructure has no built-in authentication, so only expose it on networks you trust.If you use the
--pidfile $PIDFILEoption, the process will daemonize and return you to your shell prompt.
Advanced options
⏹️ Shutting down PhotoStructure
It’s easiest to shut down PhotoStructure via the navigation menu (the “hamburger” icon in the upper right corner of the UI).
If you’re running start.sh in the foreground in a terminal, just hit ctrl-c. The photostructure main process shuts down gracefully on SIGINT.
If you’ve daemonized it with a --pidfile, run something like ./photostructure --stop --pidfile /var/run/photostructure.pid.
Why is it taking so long to shut down?
PhotoStructure may take up to a minute to shut down, depending on the size of your library and disk speed. Closing the library database requires copying it back to your library when it’s hosted on a remote filesystem.
⬆️ Upgrading PhotoStructure
If you’re using systemd, just run sudo systemctl restart photostructure to pick up the new release.
Otherwise, shut down and restart PhotoStructure: ./start.sh checks for new versions every time it starts.
Switching between beta and stable release channels
The “release channel” you’re using is based on the git branch you’ve checked out.
If, for any reason, you want to switch to the “stable” release, open a terminal and run
sudo su - photostructure
cd ~/photostructure-for-servers
git fetch
git stash -u
git checkout main
Read this forum post to learn more about different release channels (beta and stable).
Advanced settings in ./start.sh / bootstrap.js
The start.sh script supports several environment variable settings to let it behave as you want:
Set
PS_CHECK_UPDATES=none, orPS_NO_GIT=1to prevent automatic version upgradesSet
NOBREW=1on macOS to disable automatic homebrew installs and package upgradesSet
NODE=/path/to/nodeto use a specific path to a Node.js binarySet
GIT=/path/to/gitto use a specificgitbinarySet
PYTHON=/path/to/python3to use a specific Python 3.xSet
PIP=/path/to/python3to use a specific Python package installer commandSet
PS_CONFIG_DIRto override PhotoStructure’s default configuration directorySet
PS_NO_NETWORK=1to tell PhotoStructure it cannot make external network requests. See below for details.Set
PS_ENV_FILE=/path/to/file.envif you want a.envfile to override any settings. This is explained in detail here.
Troubleshooting
If you run into problems during installation or startup, find your error message in the sections below.
Node.js version is too old or missing
PhotoStructure v2026.2+ requires Node.js v22.3 or later (v24 recommended). v22.3 is needed for zlib.crc32 support. The startup script checks both that node exists in your PATH and that the version is recent enough.
Check your version:
node -v
If this prints nothing or “command not found”, Node.js isn’t installed (or isn’t in your PATH).
To fix:
- Ubuntu, Debian, Mint, LMDE: Follow the NodeSource or fnm instructions above.
- Fedora: Follow the Fedora NodeSource or fnm instructions above.
- macOS:
brew install node@24(see the macOS steps). - Windows: Download the latest installer from nodejs.org (see the Windows steps).
If you installed Node.js with fnm, make sure your shell profile evaluates fnm env (the installer adds this automatically) so the correct version is active in new terminals. For systemd services, point NODE= at the absolute path printed by fnm which 24.
Missing git, npm, or python
Error:
Please install gitPlease reinstall Git (missing git)Please reinstall Node.js (missing npm)Please reinstall Python (missing python3)
The bootstrap script checks for git, npm, and python3 (or git.exe, npm.cmd, and py.exe on Windows) in your PATH.
Check what’s installed:
git --version
npm --version
python3 --version   # or py --version on Windows
To fix:
- Ubuntu:
sudo apt install git build-essential python3-dev(see Step 2) - Fedora:
sudo dnf install git @development-tools(see Step 2) - macOS:
xcode-select --installfor git,brew install python python-setuptools node@24for the rest (see macOS steps) - Windows: Install Git for Windows and Node.js with the “Automatically install necessary tools” option checked (see Windows steps)
If the tools are installed but not found, check that their directories are in your PATH environment variable.
npm install failures
If npm install fails during bootstrap, it’s usually a compilation error or a network timeout.
Diagnostic steps:
# Can npm reach the registry?
npm ping

# What registry and proxy are configured?
npm config list

# Clear the cache and retry
npm cache clean --force
./start.sh
Common causes:
- Missing build tools: On Ubuntu, install
build-essentialandpython3-dev. On Fedora, install@development-tools. On Windows, make sure you checked “Automatically install necessary tools” during the Node.js install. - Proxy: If you’re behind a corporate proxy, configure npm:
npm config set proxy http://your-proxy:port - Stale cache:
npm cache clean --forceand retry. - Permission errors: Never run
npm installwithsudo. If you seeEACCESerrors, check that yournpm prefixis set to a directory you own.
Network disabled on first run
Error: Network access is disabled. Please enable your WAN during your first run to download PhotoStructure's dependencies.
The first startup downloads npm packages and pulls the latest code from GitHub. After that initial install, PhotoStructure can run fully offline.
To fix:
- Make sure your server can reach
registry.npmjs.organdgithub.com. - If you set
PS_NO_NETWORK=1, remove it for the initial install. - Run
./start.shagain.
Once the first run completes, you can set PS_NO_NETWORK=1 for subsequent launches. See the offline section below for details.
Python distutils / setuptools missing
Error: Failed to install Python setuptools or No module named 'distutils'
Python 3.12+ removed distutils from the standard library (PEP 632). PhotoStructure needs it (via setuptools) to compile native modules.
Check if distutils is available:
python3 -c "import distutils"
If that fails with ModuleNotFoundError, install setuptools:
- Ubuntu:
sudo apt install python3-setuptools(orpip3 install setuptools) - Fedora:
sudo dnf install python3-setuptools - macOS:
brew install python-setuptools(see macOS Step 3) - Windows:
pip install setuptools(orpy -m pip install setuptools)
If pip itself is missing: python3 -m ensurepip --upgrade (Linux/macOS) or reinstall Python from python.org with the “pip” option checked (Windows).
Unexpected errors
Error: PhotoStructure setup failed., Unexpected rejection:, or Unexpected error: (possibly followed by a stack trace)
These are catch-all errors from bootstrap. Common causes: filesystem permission problems, corrupted node_modules, or missing system libraries.
Try this first:
# Wipe node_modules and reinstall from scratch
rm -rf node_modules
./start.sh
If that doesn’t help:
# Check filesystem permissions
ls -la ~photostructure/photostructure-for-servers/

# Run with debug logging to get more detail
PS_LOG_LEVEL=debug ./start.sh
If the error persists, copy the full output and post it on the forum or Discord. Include your OS version, Node.js version (node -v), and Python version (python3 --version).
Does PhotoStructure support offline installations?
PhotoStructure only needs WAN access to NPM and GitHub during version upgrades. If your external network is unavailable when PhotoStructure launches, it detects this and starts in “no network” mode. You can force this mode by setting PS_NO_NETWORK=1.
Note that PLUS license renewals require the browser viewing your PhotoStructure library to access account.photostructure.com.
Raspberry Pi installation instructions have been moved here.